
how to make a milkshake without a blender is exactly the kind of question that shows up when you’re standing in the kitchen, craving something cold and creamy, but the blender is either missing, broken, or just making that weird humming sound like it’s tired of your life choices. You kinda just stand there staring at milk and ice cream like it should magically solve itself, and yeah… it doesn’t.
What you actually need is not fancy equipment but a bit of patience, some old-school mixing tricks, and honestly a willingness to get slightly messy. And weirdly enough, milkshakes existed long before blenders became common anyway, so you’re not doing anything “wrong” here at all.
The real idea behind how to make a milkshake without a blender
At its core, a milkshake is just air, fat, cold, and sweetness all forced into one glassy chaos. The blender only makes it faster. Without it, you’re basically doing what soda fountains did in the early 1900s—manual mixing, shaking, mashing, and stirring like you mean it.
Back then, milkshakes were often made with hand-cranked mixers or simply shaken in metal tins. It wasn’t fancy, but people still loved them. So yeah, you’re kinda going vintage without trying.
What you actually need (no blender version)
You don’t need much, which is the comforting part when you realize your blender is not coming to rescue you.
Basic ingredients:
- Cold milk (whole milk works best, but any works honestly)
- Ice cream (vanilla is the “safe default” but chocolate or strawberry works too)
- Sugar or honey (optional, depends how sweet your tooth is behaving today)
- Flavor add-ins (chocolate syrup, fruits, peanut butter, whatever you got)
Tools that can replace a blender:
- A large bowl or deep cup
- A whisk OR a fork (yes, really)
- A mason jar or bottle with lid (for shaking method)
- A potato masher or spoon (for soft ice cream crushing)
It feels almost too simple, and that’s the weird part. People overthink milkshakes way too much.
Method 1: The whisk-and-patience technique
This is the most straightforward answer to how to make a milkshake without a blender.
You start by letting your ice cream soften just a little. Not melted soup—just soft enough that your spoon doesn’t feel like it’s fighting a frozen wall.
Then:
- Scoop ice cream into a bowl
- Pour a small amount of milk over it
- Start whisking slowly, then faster
- Keep pressing and breaking ice cream lumps
The texture won’t be perfect instantly. It goes through a weird stage where it looks like something went wrong in science class. But after a minute or two, it smooths out.
A common kitchen saying goes something like: “if it looks wrong, you’re probaly doing it right.” Not scientifically proven, but emotionally accurate.
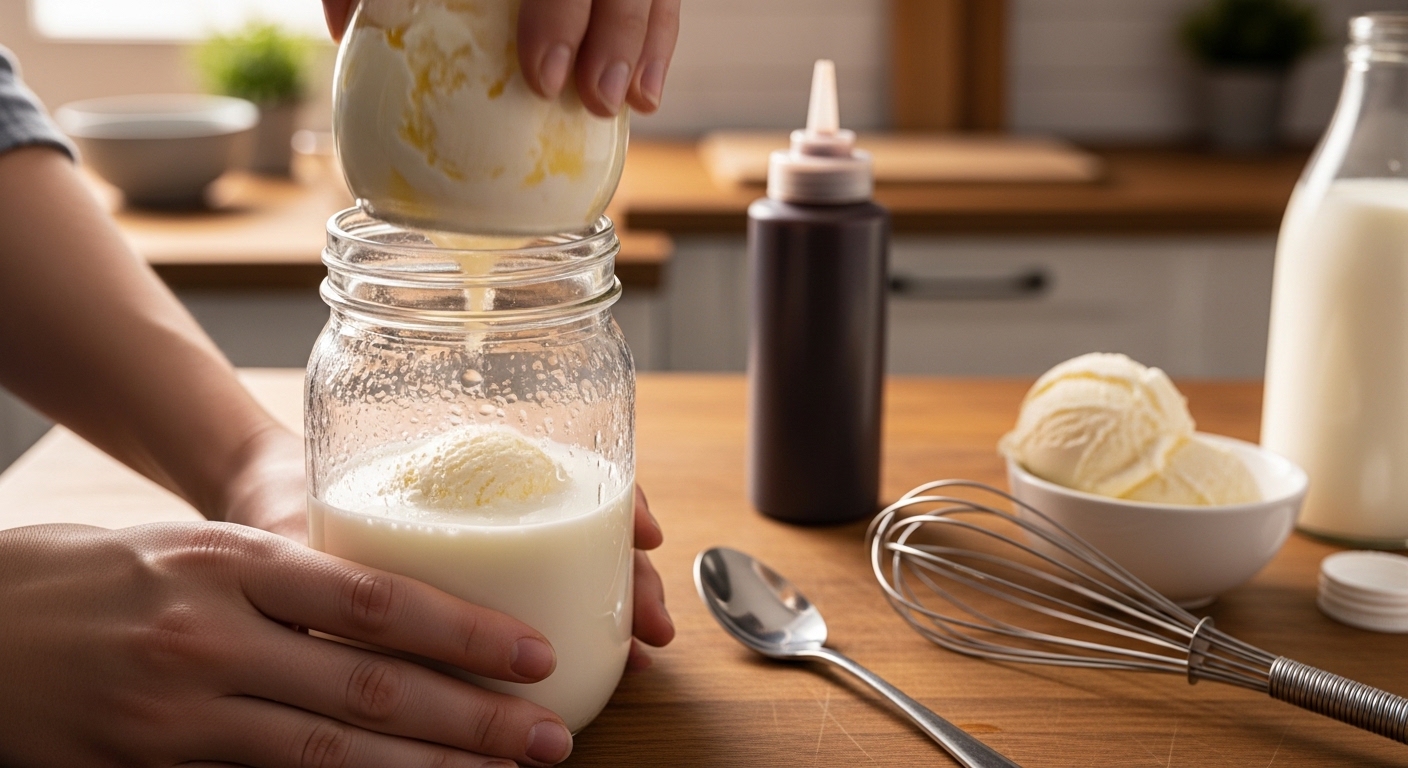
Method 2: The shake-in-a-jar trick (very underrated)
If you’ve got a jar with a tight lid, this method feels almost fun.
Steps:
- Add softened ice cream into the jar
- Pour in milk
- Add flavoring
- Close lid tightly (double-check or you’ll regret it)
- Shake like you’re angry at it for 30–60 seconds
At first it sounds too simple, but shaking actually incorporates air, which is what gives milkshakes that fluffy feel.
A small tip: don’t overfill the jar. Half full is ideal, otherwise you’ll just be fighting physics.
Method 3: Fork-mash method (for lazy but desperate moments)
This one is for those days when you’re too tired to even find a whisk.
You basically:
- Let ice cream soften more than usual
- Mash it aggressively with a fork
- Slowly add milk while mixing
It won’t be perfectly smooth, but it becomes thick and spoonable. Think of it as a “rustic milkshake,” if you want to sound fancy about it.
Comparison table of methods
| Method | Difficulty | Texture Quality | Time Needed | Equipment |
|---|---|---|---|---|
| Whisk method | Medium | Smooth-ish | 5–10 min | Bowl + whisk |
| Jar shaking | Easy | Quite smooth | 1–2 min | Jar with lid |
| Fork mash | Very easy | Chunky creamy | 3–5 min | Fork or spoon |
So yeah, none of them are perfect, but none of them fail either.
Why milkshakes still work without machines
Milkshakes rely on a simple physical trick: mixing fat and liquid while trapping air. That’s it. Blenders just speed up what you could technically do by hand.
Interestingly, food historians note that early milkshakes in the 1800s were more like alcoholic eggnog-style drinks before evolving into the ice cream version we know today. The modern sweet milkshake became popular in American soda fountains around the early 20th century, especially after ice cream became more widely available and affordable.
So when you’re making one without a blender, you’re not improvising—you’re actually closer to the original version than most people realize.
Common mistakes people make
Even something simple like this can go slightly wrong if you rush it.
1. Using rock-hard ice cream
It just refuses to mix and turns everything into a lumpy disaster.
2. Too much milk too early
This makes it watery instead of creamy. Add slowly, always.
3. Not mixing long enough
Most people quit right before it gets smooth. patience is weirdly important here.
4. Wrong container size
Too small = mess. Too big = uneven mixing.
Flavor ideas that actually work well
You don’t need a blender to get creative. In fact, some flavors taste better when manually mixed because they stay slightly textured.
- Chocolate + peanut butter (very thick, almost dessert-like)
- Strawberry + honey (soft and light)
- Banana + vanilla (classic, hard to mess up)
- Coffee + chocolate syrup (kind of like a DIY frappé situation)
- Oreo crushed by hand + milk + ice cream (messy but worth it)
A small note: crushing cookies by hand gives uneven bits, but that unevenness actually makes it more interesting to eat.
Tips to make it taste “real” like café style
Even without machines, you can still get surprisingly close to café-quality milkshakes.
- Chill your glass beforehand (big difference, weirdly enough)
- Use full-fat milk if possible
- Don’t rush mixing, let air get in naturally
- Slightly soften ice cream before starting
- Add a tiny pinch of salt to enhance sweetness (sounds odd, works well)
There’s also this overlooked trick: the longer you shake or whisk, the thicker it feels because air gets trapped in the mixture. It’s not magic, just physics doing its thing quietly.
When things go slightly wrong (and how to fix it)
If your milkshake ends up too thin, just add more ice cream and remix.
If it’s too thick, add a splash of milk and stir slowly instead of aggressively.
If it’s lumpy, keep mixing a bit longer or mash against the side of the bowl.
Honestly, most “failed” milkshakes are fixable within 1–2 minutes. It’s forgiving food, which is probably why everyone likes it.
Final thought before you go make one
Learning how to make a milkshake without a blender is less about following strict rules and more about understanding that food doesn’t always need machines to feel good. You just need cold ingredients, a bit of movement, and that slightly chaotic willingness to shake or stir until it comes together.
And when you finally take that first sip—maybe it’s not perfect, maybe it’s a little uneven—you’ll still realize it tastes exactly like what you were craving in the first place.

Jamesmathew is an expert Amazon affiliate writer, helping readers discover top products, smart deals, and practical buying guides through honest reviews and insightful content.