
You probably searched how to wash beauty blender because yours is sitting there right now, kinda damp, kinda stained, and you’re lowkey wondering if it’s still safe to use or if you’ve been dabbing bacteria onto your face for like… days maybe weeks, who even knows anymore. It happens, honestly, no one really teaches you this stuff properly.
There’s this weird thing where you rinse it, squeeze it a bit, it looks okay-ish, and you just decide yeah that’s fine, job done. But deep inside you know it’s not really clean, it’s just pretending. And that’s the part we’re fixing here.
Why Cleaning Your Beauty Blender Matters More Than You Think
So here’s the slightly uncomfortable truth, your beauty blender is basically a sponge, and sponges are like tiny hotels for bacteria, except they don’t charge rent and they never close. When you use it daily, especially with liquid foundation, it absorbs product, oil, sweat, and dead skin cells. Sounds a bit gross when you say it out loud, right.
According to dermatology research, makeup tools can harbor bacteria like Staphylococcus and even traces of mold if left damp for too long. A study published in the Journal of Applied Microbiology found that over 70% of used makeup tools contained potentially harmful microbes. That’s not exactly comforting, I mean.
If you’ve ever noticed:
- Breakouts that don’t make sense
- Weird smells from your sponge
- Foundation not blending properly anymore
Yeah, that’s probably your blender begging for a wash, or maybe screaming quietly.
How Often Should You Wash a Beauty Blender
You might not like this answer, but ideally, you should wash your beauty blender after every use. I know, I know, that sounds like too much effort and nobody really does that consistently.
A more realistic approach:
- Best case: After every use
- Okay-ish: Every 2–3 uses
- Not great but common: Once a week
If you’re using it daily and only washing weekly, just know you’re taking a small risk with your skin, especially if you’re acne-prone.
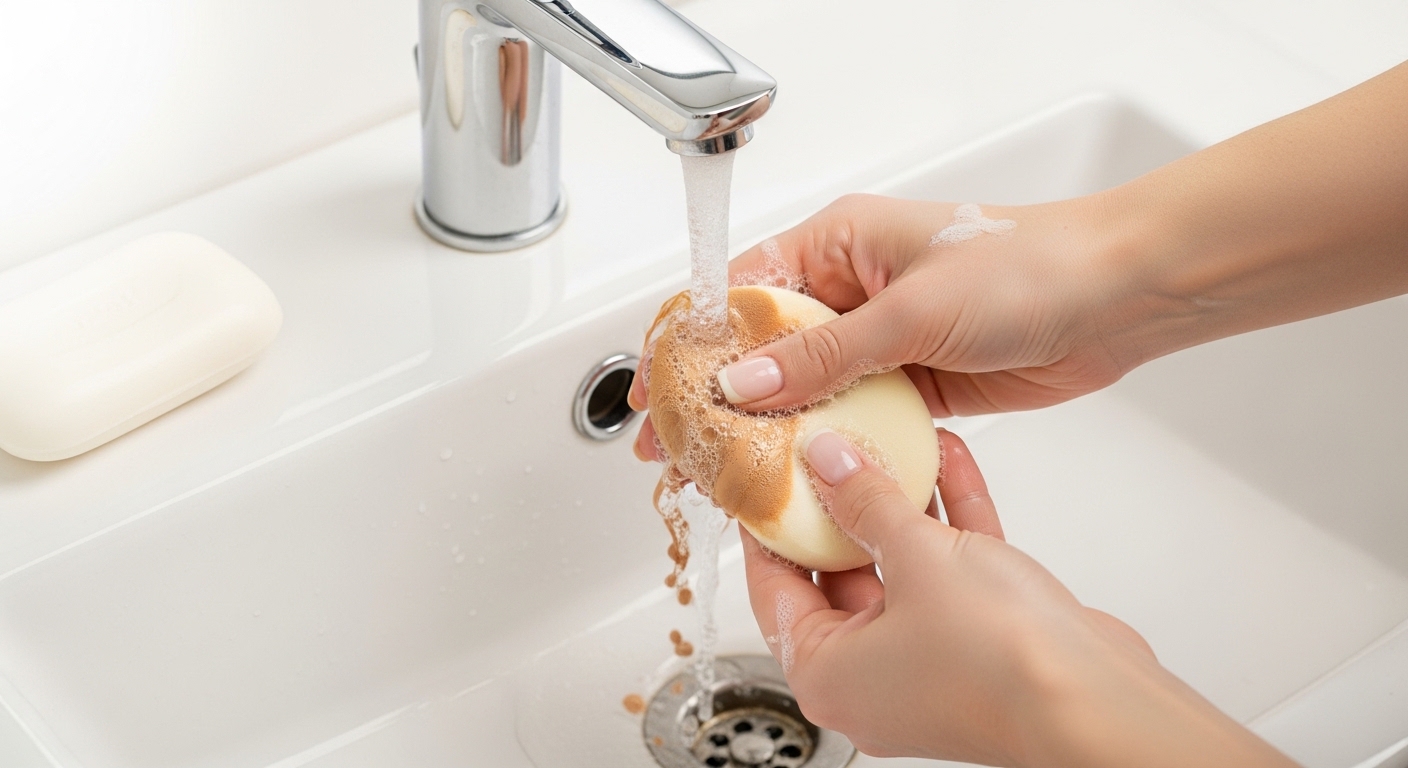
The Right Way to Wash a Beauty Blender (Step-by-Step)
Let’s not do the lazy rinse thing anymore, yeah? Here’s how to actually clean it properly.
Step 1: Wet It Completely
Run your beauty blender under lukewarm water until it fully expands. It should feel soft and squishy, not stiff or half-dry. If water isn’t soaking in easily, that’s already a sign it’s clogged inside.
Step 2: Add Cleanser
You can use:
- Liquid soap (mild, like baby shampoo)
- Solid cleanser bars made for brushes
- Dish soap (in small amounts, surprisingly effective)
Apply a small amount directly onto the sponge. Don’t go overboard, more soap doesn’t mean more clean, it just means more rinsing later which gets annoying.
Step 3: Massage Gently
Here’s where people mess up. Don’t twist or aggressively squeeze it like you’re angry at it. That damages the sponge structure.
Instead:
- Press and release repeatedly
- Gently rub the surface with your fingers
- Focus on stained areas
You’ll see foundation start to come out, sometimes in a weirdly satisfying way, not gonna lie.
Step 4: Rinse and Repeat
Rinse under running water while squeezing lightly. If the water coming out isn’t clear, you’re not done yet. Go back, add a bit more cleanser, and repeat.
This part can take a few rounds, especially if you haven’t washed it in a while. Patience is kinda required here, even if you don’t feel like having any.
Step 5: Dry It Properly
This part is way more important than people think.
- Gently squeeze out excess water
- Wrap in a clean towel and press
- Let it air dry in an open space
Don’t put it in a closed container while damp. That’s basically inviting mold to move in.
Quick Cleaning Method (When You’re Lazy But Still Trying)
Alright, sometimes you just don’t have the energy for the full process. It’s fine, happens to everyone.
Try this quick method:
- Wet the sponge
- Add a drop of soap
- Squeeze repeatedly under water
- Rinse until mostly clean
It’s not perfect, but it’s better than nothing. Think of it as maintenance, not deep cleaning.
Deep Cleaning Method (For Seriously Dirty Sponges)
If your beauty blender has stains that look permanent or smells weird even after washing, you need a deeper clean.
The Soaking Method
- Fill a bowl with warm water
- Add a bit of liquid cleanser
- Let the sponge soak for 10–15 minutes
- Massage and rinse thoroughly
Sometimes, letting it sit loosens all the buildup that normal washing doesn’t reach.
The Microwave Trick (Use Carefully)
This one sounds odd but works if done right.
Steps:
- Place sponge in a microwave-safe bowl with water and a bit of soap
- Microwave for about 30 seconds
- Let it cool before touching
This helps kill bacteria, but don’t overdo it or you might damage the sponge. Also, never microwave it dry, that’s just asking for trouble honestly.
What Cleaners Work Best
Here’s a quick breakdown so you don’t overthink it too much.
| Cleaner Type | Effectiveness | Notes |
|---|---|---|
| Baby shampoo | Good | Gentle and safe |
| Dish soap | Very good | Cuts oil really well |
| Bar soap | Good | Easy to control |
| Makeup cleanser | Excellent | Designed specifically for tools |
You don’t need expensive products, really. Sometimes basic stuff works better than fancy branded things.
Common Mistakes You’re Probably Making
Let’s call them out, just a little bit.
- Not washing frequently enough
- Using hot water that damages the sponge
- Twisting instead of pressing
- Storing it while damp
- Assuming stains = dirty (not always true)
That last one is interesting, because even a clean beauty blender can look stained. It’s about what’s inside, not just how it looks outside, which sounds deeper than it should be for a sponge but yeah.
When to Replace Your Beauty Blender
No matter how well you clean it, it won’t last forever.
Signs it’s time to let go:
- Tears or cracks
- Persistent bad smell
- Doesn’t expand properly anymore
- Feels rough or weird
Most experts recommend replacing every 3 months if used regularly. If you’re stretching it to 6 months, just be extra careful with cleaning.
Real Talk: Does It Actually Make a Difference
Yes, it does, and not in some dramatic life-changing way, but in small consistent ways that add up.
Clean beauty blenders:
- Blend makeup more evenly
- Prevent skin irritation
- Reduce breakouts
- Feel nicer to use
It’s one of those habits that seems small but quietly improves your routine over time. Like drinking more water or washing your pillowcases, boring but kinda important.
A Slightly Weird But Useful Tip
Sometimes, after washing, your sponge still feels like it has product inside, like it’s holding onto something secretly. If that happens, try squeezing it in a bowl of clean water instead of under running water. You’ll actually see residue come out more clearly.
It’s oddly satisfying and slightly disturbing at the same time.
Final Thoughts
Learning how to wash beauty blender properly isn’t complicated, but it does require a bit more effort than most people expect at first. And yeah, you’ll probably still skip a wash here and there, that’s just real life.
But if you can at least clean it regularly and properly most of the time, your skin will thank you, even if it doesn’t literally say anything. And your makeup will sit better too, which is honestly reason enough for most people.
At the end of the day, it’s just a small sponge, but the way you take care of it says a lot about how your routine is going overall, a bit messy or kinda under control, somewhere in between usually.

Jamesmathew is an expert Amazon affiliate writer, helping readers discover top products, smart deals, and practical buying guides through honest reviews and insightful content.