
Can you make butter in a blender without it turning into a weird, half-failed kitchen experiment that you regret cleaning later? yeah, that thought probably hits you right after you stare at a carton of cream sitting in the fridge and wonder if it can become something more useful than just coffee topping. And honestly, you’re not alone in that little moment of curiosity mixed with doubt.
You’ve probably seen people online shaking jars for ages or using fancy churn machines, and you’re sitting there thinking your blender should be able to do the same thing faster. It kinda can, but also there’s a bit more going on than just pressing a button and hoping for the best. Still, once you get it right, it feels almost ridiculous how simple butter actually is.
And the funny part is, humans have been making butter for thousands of years, long before electricity or kitchen gadgets existed. So yes, your blender is more than capable… it just needs the right setup and timing, or things get messy real quick.
Can You Make Butter in a Blender? The Straight Answer
Yes, you absolutely can make butter in a blender, and it’s one of those things that sounds harder than it actually is. The basic idea is simple: you’re taking heavy cream and forcing the fat molecules to separate from the liquid (buttermilk). A blender just speeds up what shaking or churning would normally do.
But here’s the catch most people don’t expect — if you overblend, you don’t ruin it exactly, but you might end up with something grainy or weirdly whipped instead of smooth butter. So timing matters more than power.
In fact, butter making is just fat separation science. Cream usually has about 30–40% fat depending on the type, and once agitation breaks the fat globule membranes, they start clumping together into butter solids.
What You Actually Need Before You Start
Before you jump into the blender method, you only need a few things. Nothing fancy, nothing expensive.
- Heavy cream (cold, not ultra pasteurized if possible)
- A blender (any standard kitchen blender works)
- Ice water
- A strainer or cheesecloth
- Salt (optional but honestly recommended)
One thing people often mess up is using warm cream. That’s where things go slightly off track because fat needs cold conditions to separate properly. If your cream is too warm, you’ll just get whipped cream that refuses to “break.”
Also, don’t fill your blender too much. Half full is usually the sweet spot or you’ll get splashing and uneven churning.
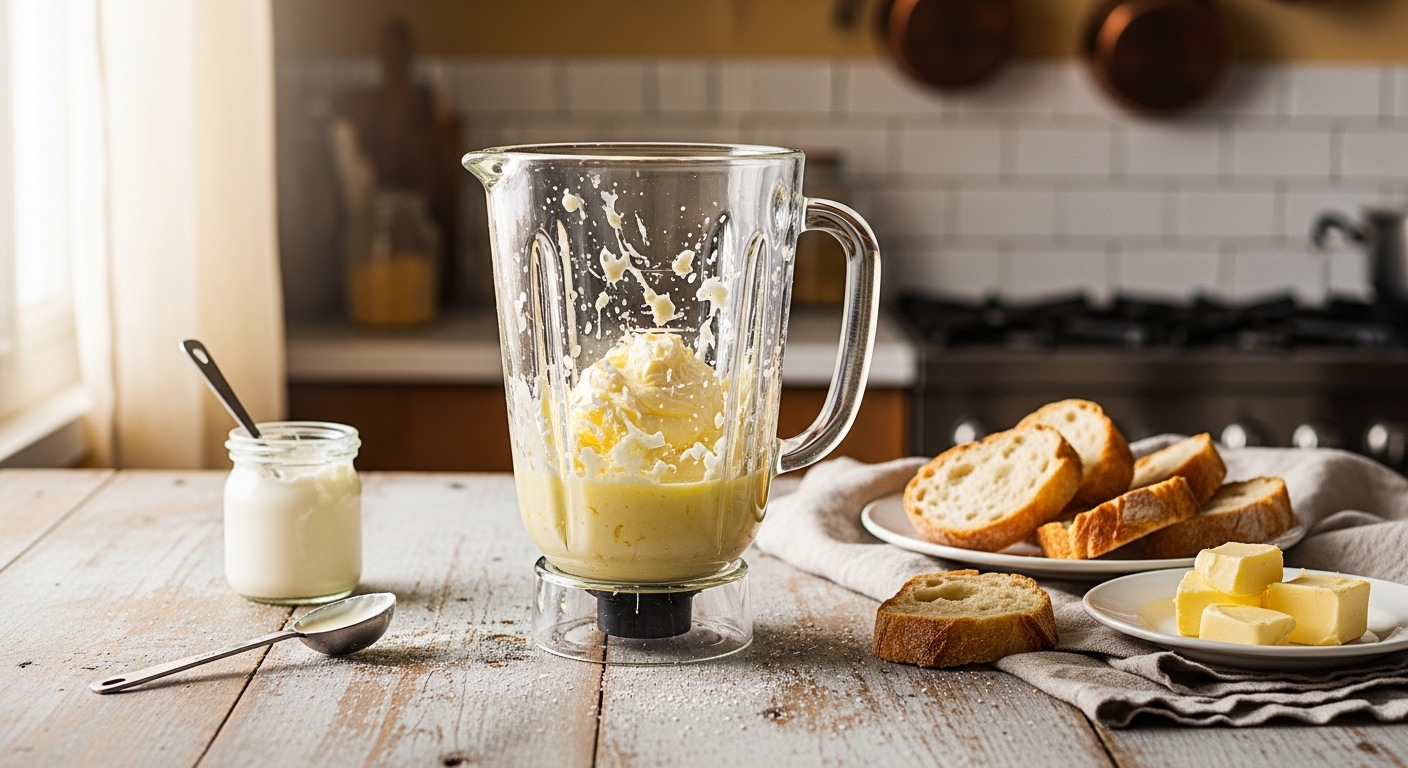
Step-by-Step: How You Make Butter in a Blender
This is where it gets fun, slightly noisy, and a bit chaotic in the best way.
Step 1: Pour the Cream
Add cold heavy cream into your blender. About 1–2 cups is perfect for beginners. If you add too much, it just takes longer and gets messy.
Step 2: Start Blending Slowly
Begin on low speed. At first, it will turn into whipped cream. That’s normal and actually expected. Don’t stop here or you’ll just have dessert topping instead of butter.
Step 3: Wait for the Separation
After a few minutes, you’ll notice something strange happening. The mixture starts looking grainy and watery at the same time. That’s the butter “breaking.”
This is the critical moment. Keep going but watch closely.
Step 4: Butter Forms
Suddenly, yellow clumps will form and separate from a thin liquid (that’s buttermilk). It looks almost like a kitchen accident, but it’s exactly right.
Step 5: Drain and Wash
Pour everything through a strainer or cheesecloth. Save the liquid if you want buttermilk for pancakes or baking.
Then rinse the butter with cold water and gently press it to remove extra liquid. This step helps it last longer and taste better.
Step 6: Add Salt (Optional)
If you want salted butter, knead in a pinch of salt. Not too much though, it sneaks up on you fast.
The Science Behind Butter Making in a Blender
This part is kinda fascinating if you think about it too long.
Cream is basically fat droplets suspended in water. Each droplet is surrounded by a membrane that keeps it stable. When you blend it, you’re violently shaking those structures until they break apart.
Once they break, fat molecules stick together instead of staying separated. That’s your butter forming.
According to dairy science explanations often referenced in food chemistry studies, butter is typically around 80–82% fat, with the rest being water and milk solids. That’s why rinsing is important — it removes leftover buttermilk that can spoil it faster.
What’s interesting is that this process hasn’t changed for centuries. Traditional butter churns just did the same job slower.
Common Mistakes People Make (and how you kinda avoid them)
Even though it’s simple, people still mess it up more than you’d think.
1. Overfilling the blender
Too much cream and it won’t churn evenly. It just sloshes around like confusion.
2. Using warm cream
Warm cream doesn’t separate properly, it just whips endlessly.
3. Stopping too early
If you stop at whipped cream stage, you never reach butter. You gotta push past it.
4. Not rinsing the butter
Skipping this step shortens shelf life and makes it taste slightly off after a day or two.
5. Blending too aggressively at the start
High speed too early can cause messy splattering and uneven fat separation.
Flavor Variations You Can Try
Once you get basic butter right, things get a bit fun.
Salted Butter
Classic version. Just a pinch of fine salt mixed in after rinsing.
Garlic Herb Butter
Add minced garlic, parsley, maybe a bit of black pepper. Great for bread or grilled food.
Honey Butter
Sweet version. A small spoon of honey blended in gently after forming butter.
Spicy Butter
A tiny bit of chili flakes or paprika. Surprisingly addictive on toast.
Nutrition Snapshot of Homemade Butter
Here’s a simple breakdown so you get a clearer idea of what you’re actually making:
| Component | Approximate Value per 100g |
|---|---|
| Calories | 717 kcal |
| Fat | 81 g |
| Saturated Fat | 51 g |
| Protein | 0.9 g |
| Carbohydrates | 0.1 g |
| Water Content | ~16–18% |
Butter is extremely energy-dense, which is why even small amounts feel rich.
Health researchers often point out that moderation matters more than elimination when it comes to dairy fats. It’s not “bad” or “good” in isolation, just depends how you use it.
Why a Blender Actually Works So Well
A blender creates rapid mechanical agitation, which speeds up fat globule clumping way faster than manual churning. Traditional butter-making could take 20–40 minutes depending on method, while a blender can do it in under 10 minutes sometimes.
That’s why modern kitchen tools changed how people interact with old recipes. You’re basically compressing time.
But there’s a tradeoff: less control. So you just have to pay attention more.
FAQ: Real Questions People Keep Asking
Can any blender make butter?
Most standard blenders can, even basic ones. You don’t need high-end equipment.
How long does it take?
Usually 5–10 minutes depending on cream temperature and blender speed.
Why did my cream not turn into butter?
It was probably too warm, or you stopped at whipped cream stage.
Can I use milk instead of cream?
No, regular milk doesn’t have enough fat content to separate properly.
How long does homemade butter last?
About 1–2 weeks in the fridge if properly rinsed and stored.
Final Thoughts
Making butter in a blender feels a bit like cheating at an old tradition, but in a good way. You’re doing something humans have done for centuries, just faster and with less arm pain. And once you see that moment where cream suddenly turns into solid butter, it’s oddly satisfying, like you unlocked a small kitchen secret.
It’s not perfect every time, and sometimes you’ll overblend or rush it, but that’s part of it too. The process teaches you more than the result sometimes does.
And once you’ve done it once, you kinda stop seeing butter as something you “buy” and more like something you can just… make when you feel like it.

Jamesmathew is an expert Amazon affiliate writer, helping readers discover top products, smart deals, and practical buying guides through honest reviews and insightful content.