

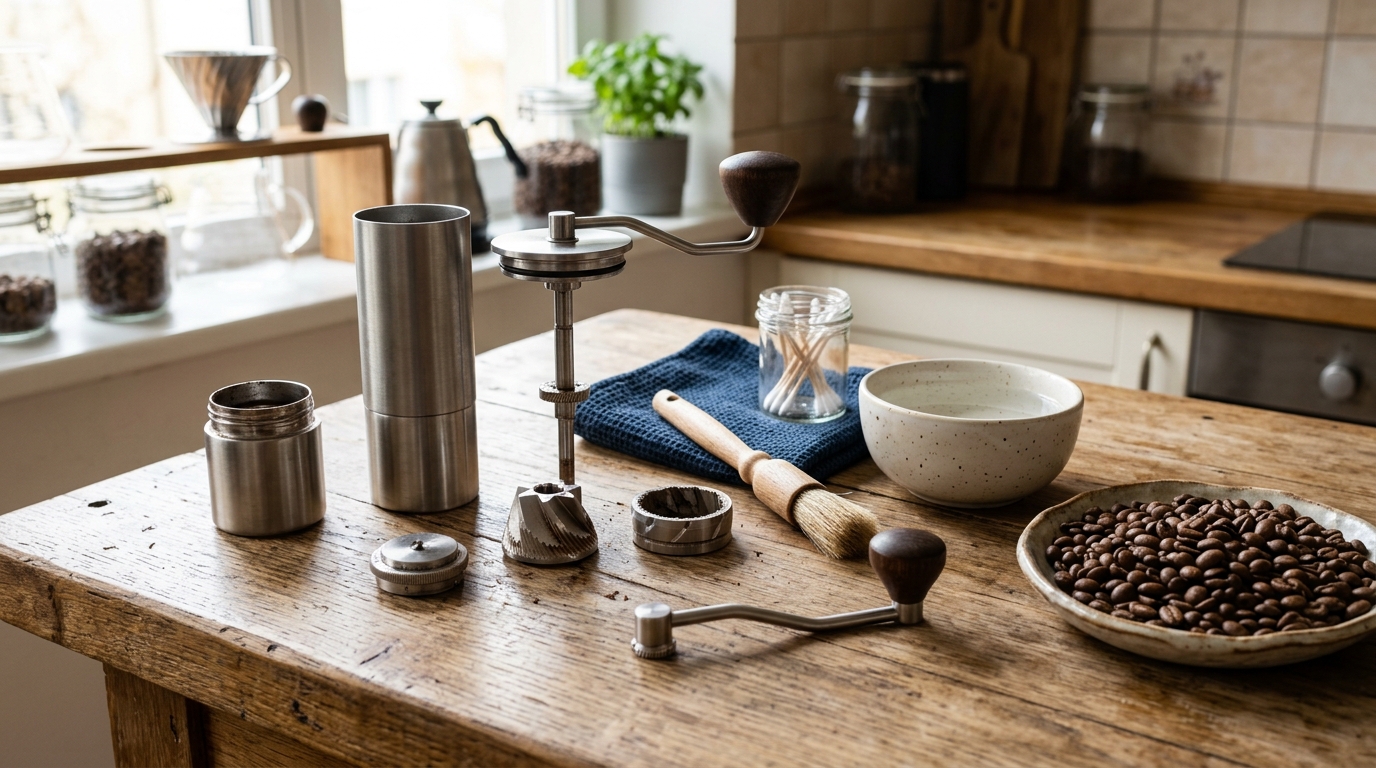
So you finally noticed your coffee tastes a little off, kind of stale and bitter at the same time, and now you’re wondering how to clean a manual coffee grinder before it ruins another morning. Yeah, that happens to basically everyone who owns one of these things for more than a couple months. You grind, you brew, you drink, and somewhere along the way you forget that little burr chamber is quietly collecting old coffee oils like it’s got nothing better to do.
Here’s the thing nobody tells you when you buy a hand grinder: it’s not a “set it and forget it” tool. Those rancid oils build up fast, especially if you’re using darker roasts, and they’ll turn your $40 morning grinder into something that tastes like an ashtray if you let it go too long. I learned this the hard way after about three months of ignoring mine, thinking a quick tap-and-dump was enough. It wasn’t.
Why Cleaning Your Manual Grinder Actually Matters
Coffee beans are surprisingly oily, even the ones that look dry and matte on the outside. According to the National Coffee Association, coffee oils (mostly a compound called cafestol along with various diterpenes) are released the moment you crack a bean open, and they cling to whatever surface they touch. In a manual grinder, that means the burrs, the inside walls of the chamber, and even the little crevices around the axle where you’d never think to look.
A researcher from the Specialty Coffee Association once noted that rancid oil residue is one of the top three causes of “phantom bitterness” in home-brewed coffee, right up there with over-extraction and bad water. That stuck with me because I always assumed bitterness was a brewing problem, not a grinder problem. Turns out it’s often both.
Old oil residue does a few unpleasant things:
- It goes rancid, and rancid oil tastes exactly like you’d imagine, sour and a bit metallic
- It clings to fresh grounds and mutes the actual flavor notes of whatever beans your using
- It attracts fine coffee dust that clumps and clogs the mechanism over time
- It can slowly gunk up the adjustment mechanism so your grind size stops being consistent
If your pour-over has been tasting muddy lately, or your espresso shots seem to choke the machine for no reason, don’t assume it’s your technique. Check the grinder first.
What You’ll Need Before You Start
You don’t need anything fancy for this, which honestly is one of the nicer parts of owning a manual grinder versus an electric one.
| Item | Purpose | Optional? |
|---|---|---|
| Soft bristle brush (a paintbrush works great) | Removing loose grounds and dust | No |
| Dry, uncooked rice (a small handful) | Absorbing oils from the burrs | No, this is the good part |
| Microfiber cloth | Wiping down the exterior and chamber | No |
| Cotton swabs | Getting into tight corners around the axle | Helpful but not required |
| Mild dish soap and warm water | Deep cleaning removable plastic parts | Only for full cleans |
| Small screwdriver (usually included) | Disassembling the burr set | Needed for deep cleans |
A lot of folks skip the rice trick because it sounds too simple to actually work, but it does. Rice is mildly abrasive and absorbent at the same time, which makes it perfect for pulling oil residue off metal or ceramic burrs without scratching anything.
Step-by-Step: The Quick Clean (Do This Weekly)
This is the version you should honestly be doing every week or two if you grind coffee daily, and it takes maybe five minutes tops.
- Unscrew the top hopper and remove any leftover beans or partial grounds
- Take the grinder apart down to the burr level, most hand grinders have this labeled in the manual, or it’s obvious once you look
- Use your soft brush to sweep out loose grounds from the burr chamber and the collection jar
- Run a small handful of raw rice through the grinder on its coarsest setting
- Discard that rice, it’s not for eating, don’t get confused there
- Brush out any leftover rice dust or oil-coated crumbs
- Wipe the chamber and burrs with a dry microfiber cloth
- Reassemble and you’re basically done
That rice pass is doing most of the heavy lifting here. It picks up oil that a brush alone just can’t touch, especially in the tiny grooves between burr teeth.
Step-by-Step: The Deep Clean (Do This Monthly, or Every 2-3 Weeks If You’re a Heavy Coffee Drinker)
Every so often the quick clean isn’t enough, particularly if you notice grind size getting inconsistent or you smell something faintly rancid when you open the hopper.
First, fully disassemble the grinder. This usually means removing the crank handle, the top burr, the bottom burr, and the adjustment collar. Take a photo before you start taking it apart, trust me, you will forget how it goes back together otherwise.
Wash the removable plastic and metal parts (not the burrs themselves, unless the manufacturer says its safe) in warm water with a tiny bit of mild dish soap. Rinse thoroughly and let everything air dry completely, this part matters a lot because any leftover moisture can cause rust on steel burrs or promote mold growth in plastic components.
For the burrs specifically, use your soft brush and cotton swabs to get into every ridge and groove. Ceramic burrs are pretty forgiving and can handle a light rinse, but steel burrs should stay dry, wipe them with a slightly damp cloth instead and dry immediately.
Once everything is bone dry, reassemble, then run your rice trick one more time as a final polish before your next real batch of beans.
Common Mistakes People Make
I’ve made most of these myself, so no judgment here, just trying to save you the trouble.
Using wet cloths on steel burrs is probably the biggest one. Moisture plus steel equals rust, and rust equals a ruined grinder faster than you’d expect, sometimes within just a few weeks of neglect.
Another mistake is over-tightening the adjustment collar after reassembly, thinking tighter means a finer grind automatically. It doesn’t work that way, and forcing it can strip the threads.
People also tend to forget the collection jar entirely. Oils and static-charged fine grounds love to cling to plastic jars, and if you never wash that part you’re basically funneling old residue right back into your fresh coffee every single time.
How Often Should You Actually Clean It
There’s no single universal answer here, it really depends on how much you grind and what roast level you prefer.
- Light roasts: less oil on the surface, can go a bit longer between cleans, maybe every 3-4 weeks for quick cleans
- Medium roasts: standard schedule, weekly quick clean is usually enough
- Dark and oily roasts: these need attention almost every use, or at minimum every few days for a fast brush-out
If you drink coffee daily and use darker beans, you’re honestly better off doing a thirty-second brush-out after every single grind rather then waiting for buildup to become a problem.
Final Thoughts
Cleaning a manual coffee grinder isn’t glamorous, nobody’s writing poetry about scrubbing burr chambers, but it genuinely changes how your coffee tastes. A well maintained grinder gives you consistent particle size, which means more even extraction, which means your $18 bag of single-origin beans actually tastes like what the roaster intended instead of like leftover diner coffee from 1997.
Give the rice trick a shot this week if you haven’t already. It sounds almost too easy, but sometimes the simple stuff works exactly because its simple. Your next cup will probably surprise you a little, in a good way.

Jamesmathew is an expert Amazon affiliate writer, helping readers discover top products, smart deals, and practical buying guides through honest reviews and insightful content.