
You’re probably here because you just realized how to wash a beauty blender isn’t as obvious as it should’ve been, like you’ve been dabbing your face with this soft lil sponge for weeks and now it’s… well, not exactly cute anymore, yeah? It happens, honestly more than people admit, and the thing is nobody really teaches you the right way, they just assume you’ll figure it out while standing at a sink half-awake.
So let’s actually fix that mess properly.
Why Cleaning Your Beauty Blender Actually Matters (more than you maybe think)
Okay so here’s the part people kinda ignore — that sponge isn’t just holding makeup. It’s holding oil, dead skin, bacteria, and probably yesterday’s foundation that didn’t quite leave even tho you swore it did.
A dirty beauty blender can:
- Break you out (like randomly, and you blame your skincare instead)
- Mess up your makeup finish (patchy, uneven, weird texture)
- Smell… off (you know the smell, don’t lie)
According to dermatology research, makeup tools that aren’t cleaned regularly can harbor bacteria like Staphylococcus aureus, which is not something you want anywhere near your skin, seriously.
So yeah, washing it isn’t optional, it’s just one of those annoying but necessary habits.
How Often Should You Wash a Beauty Blender
Not gonna sugarcoat it — ideally, you should wash your beauty blender after every use. I know, that sounds like too much, and realistically most people don’t do that (you probably won’t either every single time), but here’s a more human version of that advice:
- Best case: After every use
- Okay-ish: Every 2–3 uses
- Please don’t go beyond: Once a week max
If you’re using it daily and only washing it once every couple weeks… yeah, that’s kinda asking for trouble.
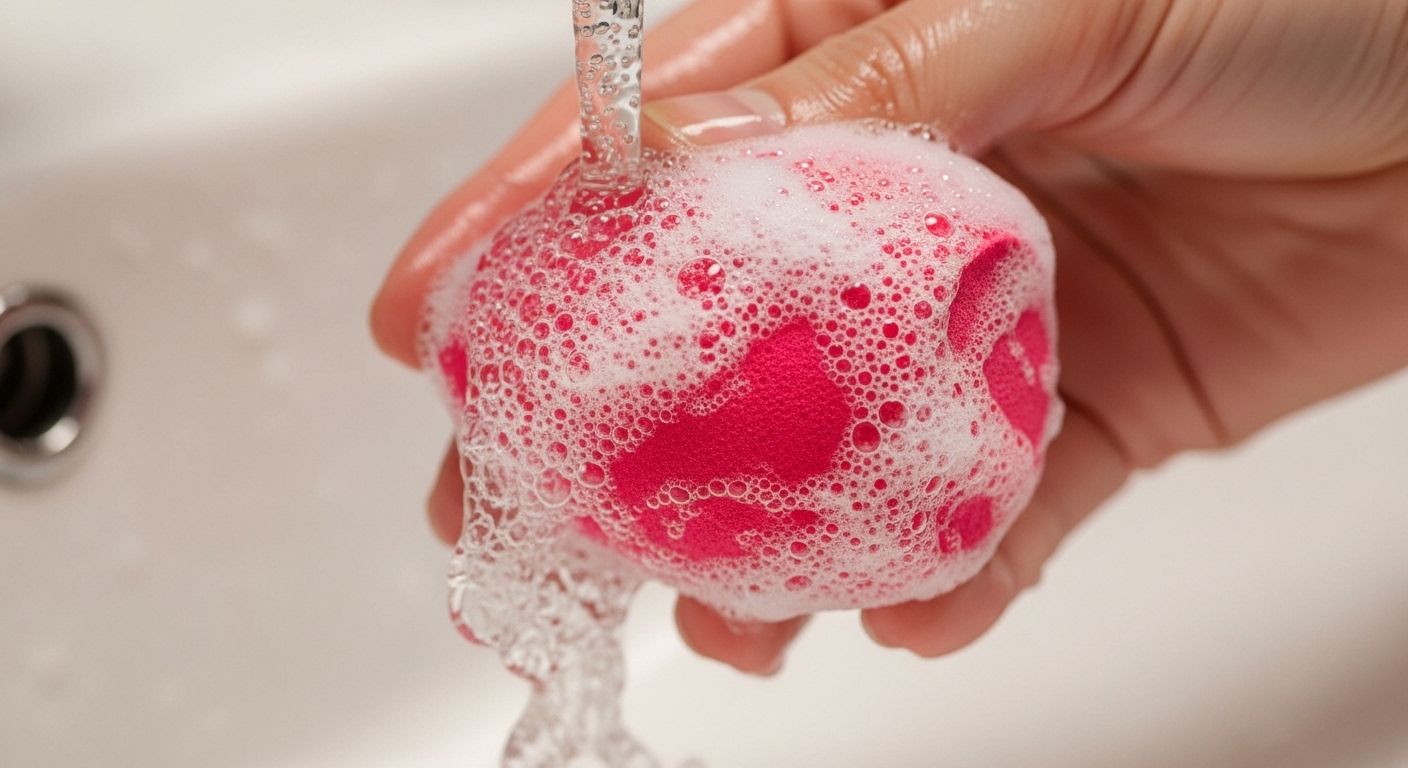
The Basic Method: How to Wash a Beauty Blender Properly
Let’s get into the actual washing part, which is simpler than it feels but also easy to mess up if you rush it.
Step-by-Step Process
- Soak it first
- Run it under lukewarm water (not hot, pls don’t cook your sponge)
- Let it fully expand and get squishy
- Apply cleanser
- Use a gentle soap, baby shampoo, or a dedicated sponge cleanser
- Avoid harsh detergents, they’ll break it down faster
- Massage gently
- Press and squeeze (don’t twist aggressively like you’re angry at it)
- Focus on stained areas
- Rinse and repeat
- Keep rinsing until the water runs clear
- If it’s still tinted, go again, no shortcuts here
- Dry properly
- Squeeze out excess water with a towel
- Let it air dry in an open space (not inside a closed bag, that’s how mold happens)
And yeah, that’s the basic routine, but there’s more to it depending on how dirty your blender is.
Deep Cleaning a Beauty Blender (when it’s… really bad)
Sometimes your sponge gets to a point where a normal wash just isn’t cutting it, like the stains are stubborn and kinda judging you.
Here’s what you do then.
Method 1: Soak + Soap Combo
- Fill a bowl with warm water
- Add a few drops of gentle cleanser
- Let the blender sit for 15–20 minutes
- Then go in and massage + rinse like usual
This helps loosen built-up makeup that’s been living inside for too long.
Method 2: The Microwave Trick (yes, but be careful)
This one sounds weird but it actually works.
Steps:
- Fill a microwave-safe cup with water and a bit of soap
- Submerge your beauty blender
- Microwave for about 1 minute
What this does is kinda disinfect it using heat, but:
- Don’t microwave it dry (it can burn)
- Let it cool before touching (it gets hot, obviously)
Not something you need to do all the time, but useful once in a while.
What Cleansers Work Best for Beauty Blenders
You don’t need anything fancy, but also don’t just grab whatever’s lying around either.
Here’s a quick breakdown:
| Cleanser Type | Works Well? | Notes |
|---|---|---|
| Baby shampoo | Yes | Gentle and affordable |
| Dish soap | Sometimes | Good for heavy buildup, but can be drying |
| Bar soap | Yes | Easy to control, works surprisingly well |
| Sponge cleansers | Best | Designed specifically, but pricier |
| Face wash | Okay | Not always strong enough |
A lotta people swear by bar soap because you can rub the sponge directly on it, which feels oddly satisfying tbh.
Common Mistakes People Make (you might be doing one)
This is where things usually go wrong, not in the washing itself but in the habits around it.
Mistakes to Avoid
- Using hot water
It can damage the sponge material over time - Twisting too hard
That’s how you tear it, and then you’re stuck with a sad, ripped sponge - Not rinsing fully
Leftover soap can irritate your skin later - Storing it damp in closed spaces
Basically inviting mold to move in - Waiting too long to clean it
The longer you wait, the harder it gets
You don’t need to be perfect, just don’t be careless about it.
How to Dry a Beauty Blender the Right Way
Drying is one of those steps people rush through or ignore, but it matters more than it seems.
Proper Drying Tips
- Use a clean towel to gently press out water
- Leave it in a well-ventilated area
- Avoid drawers, makeup bags, or closed containers
- Let it fully air dry before next use
If it stays damp too long, bacteria grows, and then you’re back to square one.
When to Replace Your Beauty Blender
Even if you clean it perfectly, it won’t last forever. At some point, it just… gives up.
Signs it’s time to let it go
- It starts tearing or cracking
- Stains won’t come out no matter what
- It feels different (less bouncy, more stiff)
- There’s a weird smell that won’t leave
Most experts recommend replacing your beauty blender every 3 months, especially if you use it daily.
Real Talk: Is It Okay to Use a Dirty Beauty Blender Once?
Look, realistically, you might skip washing it sometimes. It happens.
Using it once when it’s slightly dirty? Probably not the end of the world.
But if it’s:
- Visibly stained
- Smells weird
- Feels sticky
Then yeah, don’t use it, your skin will not appreciate that decision later.
Quick Routine You Can Actually Stick To
If you’re someone who forgets (or just doesn’t wanna deal with it every day), here’s a low-effort routine:
- Rinse lightly after each use
- Deep clean every 3–4 days
- Air dry properly
- Replace every few months
That’s manageable, not perfect, but good enough to keep things clean-ish.
A Slightly Odd Tip That Actually Helps
This might sound random, but keeping your cleanser right next to your sink or makeup area makes a difference. If it’s visible, you’re more likely to actually wash your beauty blender instead of thinking “I’ll do it later” and then never doing it.
Small habit, weirdly effective.
Final Thoughts on How to Wash a Beauty Blender
At the end of the day, figuring out how to wash a beauty blender isn’t complicated, it’s just one of those things people overlook until it becomes… noticeable, in not a good way. Once you get into the habit, it takes like a minute or two, and your makeup honestly looks better for it, which is kinda the whole point anyway.
You don’t need perfect technique, just a bit of consistency and maybe less procrastination than usual. Your future skin will thank you, even if your current self is slightly annoyed about having to clean a sponge again.

Jamesmathew is an expert Amazon affiliate writer, helping readers discover top products, smart deals, and practical buying guides through honest reviews and insightful content.