
You’re standing there wondering how to use beauty blender properly, because every time you try it, your makeup either disappears into the sponge like it’s being eaten alive or just sits there looking… kinda patchy and off, not blended but also not bold, just confusing honestly.
And yeah, nobody really explains the small things that actually matter. They just say “dab dab blend” like that solves anything. It doesn’t. So let’s actually walk through it in a way that makes sense, even if it feels slightly chaotic, which makeup kinda is sometimes.
What Even Is a Beauty Blender, Really
A beauty blender is basically a sponge, but not just any sponge like the ones you’d wash dishes with (please don’t try that, it will go badly). It’s a soft, squishy, egg-shaped tool designed to blend liquid and cream products into your skin so they don’t sit on top like paint.
The original one, the famous pink one, was created by a makeup artist named Rea Ann Silva, and it kinda changed how people apply foundation. According to industry reports, sponge-based blending tools became massively popular after its release, with global cosmetic sponge sales increasing by over 30% in the following years. Which is wild for… a sponge, honestly.
But using it right? That’s where things get a bit off-track for most people.
The First Thing You’re Probably Doing Wrong
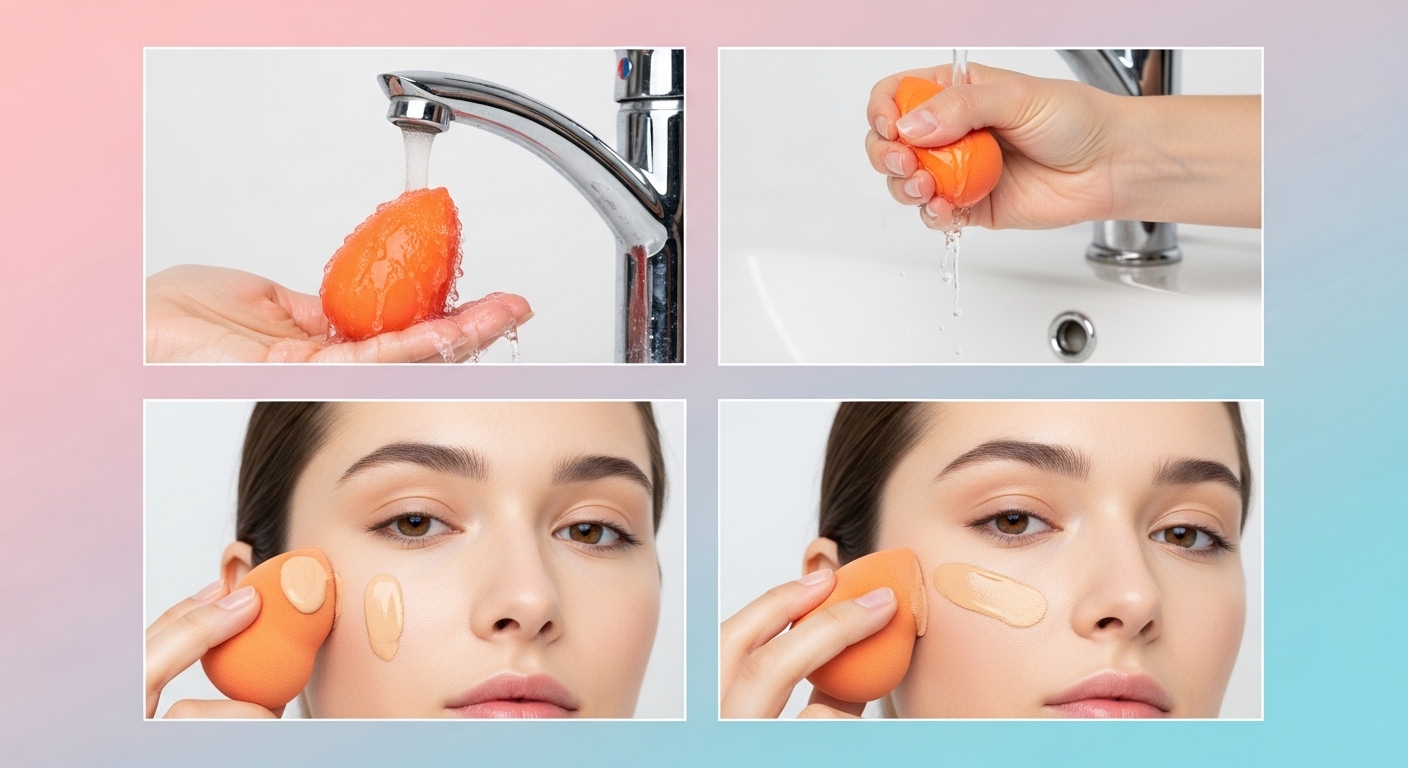
You’re Using It Dry (Yeah, Don’t)
This is the part where most people mess up and don’t even realize it.
A beauty blender should never be used dry. Like, ever. When it’s dry, it just absorbs your foundation and leaves your skin looking streaky and sad.
What you’re supposed to do:
- Run it under water until it fully expands
- Squeeze out the excess water
- Then squeeze again using a towel so it’s damp, not dripping
It should feel slightly bouncy and cool, not soggy. If it’s dripping, you went too far. If it’s stiff, you didn’t go far enough. There’s a weird middle zone you kinda just learn by doing.
Why Damp Matters So Much
When the sponge is damp, it creates a barrier so it doesn’t absorb too much product. It also helps spread the makeup more evenly, almost like it’s gliding instead of dragging.
Some makeup artists say a damp sponge can reduce product waste by up to 50%, which is… kind of painful to think about if you’ve been using expensive foundation wrong this whole time.
How to Use Beauty Blender Step by Step (But Not Robotic About It)
Step 1: Prep Your Skin (Don’t Skip This One)
Before you even touch the blender, your skin needs to be ready.
That means:
- Clean face
- Moisturizer
- Primer (if you use one, not mandatory but helpful)
If your skin is dry, the blender will just move product around weirdly instead of blending it. Think of it like painting on a rough wall vs a smooth one. Same paint, very different result.
Step 2: Apply Foundation (Not Directly Onto the Sponge)
This part surprises people, but you don’t put foundation straight onto the beauty blender most of the time.
Instead:
- Dot foundation on your face (forehead, cheeks, chin)
- Then use the blender to blend it out
Why? Because putting it on the sponge first just wastes product. It gets soaked in before it even touches your skin.
Though, if you’re going for a super sheer look, putting a tiny bit on the sponge can work, just don’t overdo it.
Step 3: The Dabbing Motion (Not Swiping, Please)
Here’s the main technique: bounce, don’t drag.
Use a gentle dabbing or bouncing motion. It might feel a bit silly at first, like you’re tapping your face for no reason, but it works.
- Bounce quickly for lighter coverage
- Bounce slower for more coverage
- Use the rounded side for larger areas
- Use the pointed tip for under eyes and around the nose
Swiping the sponge will just move product around and create streaks. It’s tempting, I know, but resist it.
Step 4: Build Coverage Slowly
Don’t try to cover everything in one go. That’s where things get cakey real fast.
Instead:
- Apply a thin layer
- Blend it out
- Add more only where needed
This layering method is what gives that smooth, skin-like finish people talk about. It’s not magic, it’s just patience, which is annoying but true.
Using a Beauty Blender for Different Products
Foundation
This is the main use. A beauty blender works best with liquid or cream foundations.
Pro tip: If your foundation looks too heavy, go over it again with a clean, damp blender. It kind of lifts excess product without removing everything.
Concealer
Use the pointed tip for under eyes.
- Dab gently, don’t press too hard
- Focus on blending the edges more than the center
This helps keep coverage where you need it while avoiding that creased, heavy under-eye look.
Cream Blush and Bronzer
A beauty blender gives a very natural finish with cream products.
- Apply product to your face or directly onto the sponge
- Blend using light bouncing motions
It melts the product into your skin instead of sitting on top, which is what makes it look more “real” and less makeup-y.
Powder (Yes, You Can Use It)
Not everyone knows this, but you can use a beauty blender for powder too.
- Use it slightly damp
- Dip it lightly into powder
- Press it onto the skin (don’t drag)
This technique is often used for “baking,” especially under the eyes. It gives a smoother, more locked-in finish.
Common Mistakes That Ruin the Whole Thing
Using Too Much Product
If your sponge feels heavy or your makeup looks thick, you’re probably using too much.
Remember, the beauty blender spreads product out. A little goes a long way, even if it doesn’t feel like it at first.
Not Cleaning It (Yeah, This Matters More Than You Think)
A dirty beauty blender is basically a bacteria sponge, which sounds gross because it is.
Dermatologists have found that unwashed makeup sponges can harbor bacteria like E. coli and Staphylococcus after just a few uses. Which is… not something you want near your face.
Clean it:
- After every use if possible
- Or at least a few times a week
Use mild soap or a cleanser made for sponges. Squeeze, rinse, repeat until the water runs clear-ish.
Keeping It Too Long
Even if you clean it, a beauty blender doesn’t last forever.
Replace it every 3–6 months, depending on how often you use it. If it starts tearing or smells weird even after washing, it’s time to let it go.
A Quick Comparison Table (Because Sometimes That Helps)
| Feature | Beauty Blender | Brush |
|---|---|---|
| Finish | Natural, skin-like | More polished, sometimes heavier |
| Coverage | Buildable | Usually fuller in one go |
| Ease of Use | Beginner-friendly-ish | Requires more technique |
| Product Waste | Lower (when damp) | Slightly higher |
| Cleaning | Needs frequent washing | Also needs cleaning, but less often |
Neither is “better,” just different. Some people even use both together.
Small Tricks That Make a Big Difference
Use a Clean Blender to Fix Mistakes
If you applied too much blush or foundation, use a clean damp blender to soften it. It kinda erases mistakes without fully removing the makeup.
Chill It Slightly (Not Freezing, Just Cool)
Some people like to use a slightly cool sponge for under-eye areas. It can help reduce puffiness and feels… oddly refreshing, even if that sounds dramatic.
Use Different Sides Strategically
- Flat side (if your sponge has one): good for pressing product in
- Rounded side: blending large areas
- Tip: precision work
It’s not just a random shape, even if it looks like one.
What Makeup Artists Actually Say
Makeup artist Lisa Eldridge once mentioned in an interview that “the key to seamless skin is not just the product, but how you press it into the skin,” which is basically what a beauty blender is designed for.
Another artist, Pat McGrath, is known for using sponges to create that almost airbrushed finish on models, especially backstage at fashion shows. It’s less about perfection and more about texture, which sounds vague but makes sense when you see it.
Final Thoughts (But Not in a Formal Way)
Learning how to use beauty blender isn’t hard, but it’s also not as obvious as people pretend it is. There’s a bit of trial and error, a bit of “why does this look worse today than yesterday,” and then suddenly one day it just works and you’re like… oh, okay, that’s what they meant.
You don’t need to be perfect with it. Some days your makeup will look great, other days slightly off, and honestly that’s normal. The goal isn’t flawless, it’s just better than before, which is a pretty reasonable place to land.
If your makeup has been looking patchy or uneven, it’s probably not you, it’s just small technique things that nobody bothered to explain properly. Now you know them, or at least most of them, which should make things a bit easier, or at least less confusing than before.

Jamesmathew is an expert Amazon affiliate writer, helping readers discover top products, smart deals, and practical buying guides through honest reviews and insightful content.