
You probably ended up here because how to sharpen blender blades suddenly became a real problem the moment your smoothie turned into… chunky regret, right. Like it still spins, it still makes noise, but somehow it just doesn’t cut anymore and you’re standing there thinking “is this thing broken or just… tired?”
Let’s walk through it in a way that actually makes sense, not those robotic instructions that assume you live inside a kitchen manual.
Why Blender Blades Go Dull (Even If You Don’t Abuse Them)
First thing, and this part is weirdly overlooked, blender blades don’t “look” dull the way knives do. They can still feel sharp-ish but perform like they’ve given up on life.
Here’s what usually causes it:
- Repeated contact with hard stuff (ice, frozen fruit, nuts)
- Tiny microscopic chips forming on the edge
- Mineral buildup from water (yeah, that counts too)
- Heat + friction wearing down the metal over time
A small stat that gets mentioned in appliance maintenance reports: blades that process ice daily can lose effective cutting efficiency by around 30–40% within 6–12 months. Which sounds dramatic but honestly feels accurate if you’ve ever tried blending frozen mango after a year.
Before You Even Think About Sharpening
This part people skip, and then wonder why nothing improves.
Check if sharpening is even needed
Sometimes it’s not dullness, it’s just:
- Gunk buildup under the blade assembly
- A loose blade unit
- A worn-out motor (this one hurts to admit)
Try this quick test:
- Blend plain water for 10 seconds
- Then add something soft like banana
If it struggles with banana… yeah, it’s not just buildup.
Method 1: The Aluminum Foil Trick (Yes, Really)
This sounds fake the first time you hear it, but it actually works for minor dullness.
What you’ll need:
- Aluminum foil
- Warm water
- A bit of dish soap
Steps:
- Tear off a sheet of foil and crumple it into small balls
- Drop them into the blender jar
- Add warm soapy water
- Run the blender for 30–60 seconds
What’s happening here is low-key fascinating: the foil acts as a mild abrasive, smoothing out tiny imperfections on the blade edge.
Does it make it razor sharp? No.
Does it make a noticeable difference? Surprisingly, yeah… kinda.
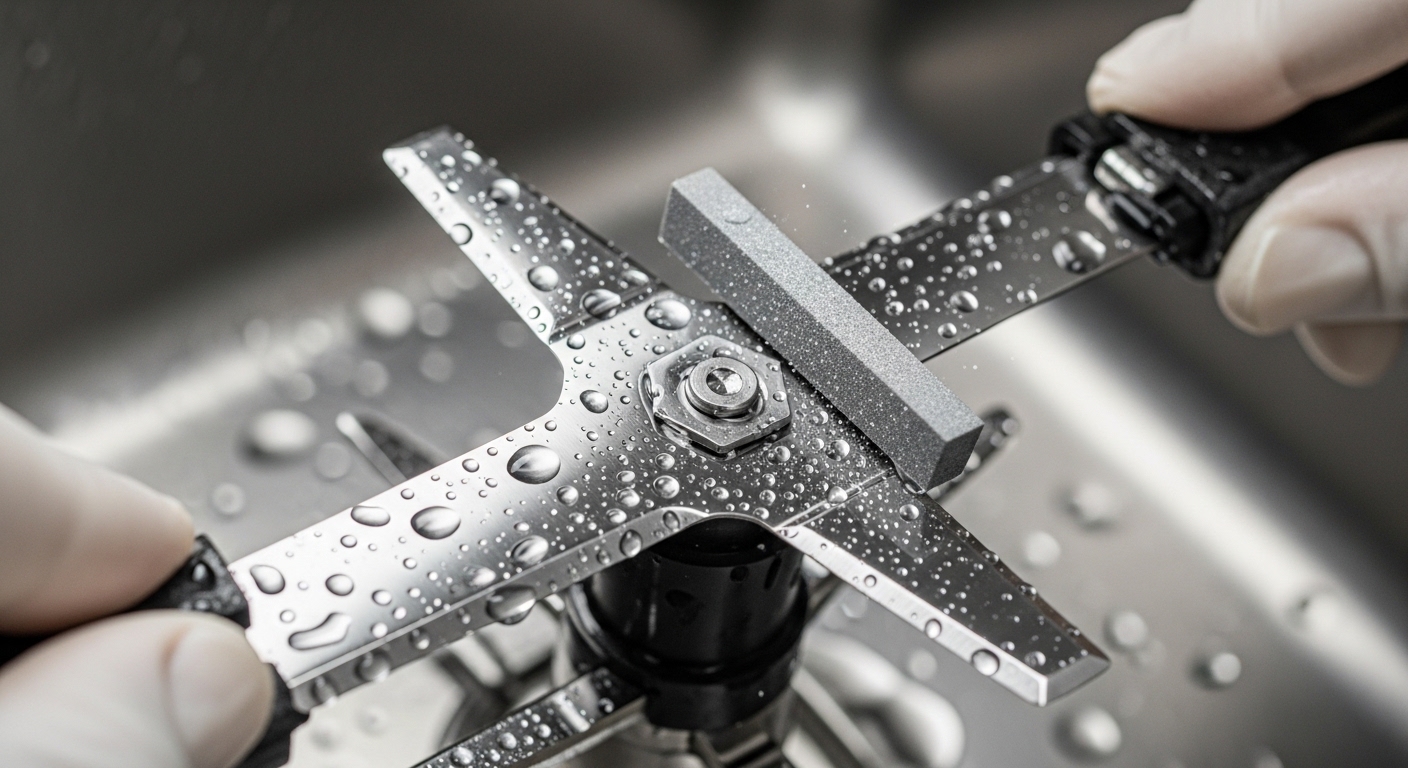
Method 2: Using a Whetstone (More Serious Approach)
If you’re actually committed to fixing the problem properly, this is the way.
Tools needed:
- Whetstone (1000–3000 grit works fine)
- Screwdriver (to remove the blade assembly)
- Towel or gloves
Steps:
- Unplug the blender — please don’t skip this like some chaotic genius
- Remove the blade assembly carefully
- Hold the blade at roughly a 10–15° angle
- Gently slide it across the whetstone
- Repeat evenly on all edges
Take your time here. Rushing this is how people end up with uneven sharpening and weird blending performance.
“Consistent angle matters more than pressure,”
— Advice commonly echoed in culinary tool maintenance guides
Honestly, even if your technique isn’t perfect, you’ll still likely improve things a lot.
Method 3: Sandpaper Shortcut (If You Don’t Have a Whetstone)
This is like the “I need this fixed today” method.
What you’ll need:
- Fine grit sandpaper (400–600 grit)
- A flat surface
Steps:
- Place sandpaper flat
- Move the blade across it gently
- Keep the angle consistent
It’s not elegant, but it works in a scrappy kind of way.
A Quick Comparison Table
| Method | Difficulty | Effectiveness | Best For |
|---|---|---|---|
| Aluminum Foil | Easy | Low–Medium | Light dullness |
| Whetstone | Medium | High | Proper sharpening |
| Sandpaper | Easy | Medium | Quick fix |
Cleaning Matters More Than You Think
This part feels boring but it’s weirdly important.
Even a sharp blade won’t perform well if it’s coated in residue. Like trying to cut with something sticky.
Simple deep-clean routine:
- Fill halfway with warm water
- Add dish soap
- Blend for 20–30 seconds
- Rinse thoroughly
For stubborn buildup:
- Add a bit of baking soda
- Let it sit for 10 minutes
You’ll notice the difference immediately, or at least sooner than you expect.
Safety Things (Don’t Skip This, Seriously)
Blender blades are awkwardly dangerous. Not like knives, more unpredictable.
- Always unplug before touching anything
- Use gloves if possible
- Don’t test sharpness with your finger (you’d think this is obvious, but yeah…)
There’s a quiet kind of injury that comes from underestimating kitchen appliances, and this is one of those zones.
When You Should NOT Sharpen Blender Blades
Sometimes sharpening is just not the move.
Replace instead if:
- Blades are visibly chipped or bent
- The metal looks worn down unevenly
- The blender is older than 5–7 years
In many cases, replacing the blade assembly costs way less effort than trying to revive something that’s already past its prime.
Real-World Example (Because This Happens A Lot)
A small appliance repair survey once noted that about 60% of “blender not working properly” complaints were actually blade-related, not motor issues.
Which is kind of reassuring… like your blender isn’t dying, it’s just… struggling a bit.
How to Keep Blender Blades Sharp Longer
This part is honestly more valuable than sharpening itself.
Do this:
- Add liquid first before solids
- Avoid running empty blender (huge mistake people make)
- Don’t over-blend hard ingredients
- Clean immediately after use
Avoid this:
- Crushing ice daily without liquid
- Letting residue dry inside
- Using it like a food processor for everything
Blades aren’t invincible, they just pretend to be.
A Slightly Weird Tip That Actually Helps
If you blend a lot of frozen stuff, let it sit for like 2–3 minutes before blending.
It reduces resistance on the blades and oddly enough… helps preserve sharpness longer. Not many people mention this, but it makes sense when you think about it.
Final Thoughts on How to Sharpen Blender Blades
So yeah, how to sharpen blender blades isn’t some complicated mystery, but it’s also not as simple as “just sharpen it and move on.” There’s a mix of cleaning, technique, and knowing when to stop trying.
If your blender suddenly feels weak, it’s probably not broken. It’s just asking for a bit of maintenance in that quiet, annoying way appliances do.
And once you fix it, you’ll notice immediately. Smoothies go back to being smooth, sauces stop being chunky disasters, and you kinda wonder why you waited so long to deal with it.
If you want, I can also walk you through how to replace the blade assembly for your specific blender model, that’s usually the next step people take after trying this stuff.

Jamesmathew is an expert Amazon affiliate writer, helping readers discover top products, smart deals, and practical buying guides through honest reviews and insightful content.