
Can you make hummus in a blender and still get that creamy, almost fluffy texture you see in cafes? yeah, that’s the exact question that usually hits you when you’ve got a can of chickpeas sitting in the kitchen and zero food processor in sight. You’re probably standing there thinking it might turn out chunky, or worse, weirdly glue-like, and honestly that doubt is pretty normal.
The good news is you absolutely can make hummus in a blender, and not just “barely edible” hummus either. If you do it right, it can come out smooth enough that someone might even argue with you about whether it’s homemade or store-bought. There are just a few small tricks that change everything, and we’ll get into those without overcomplicating things.
Why people even ask “can you make hummus in a blender”
Most recipes online casually assume you own a food processor like it’s a basic human necessity, which is kinda funny if you think about it. But a lot of kitchens around the world don’t. So the blender becomes your only real option.
Here’s where the confusion comes in:
- Blenders are great at liquids, not thick pastes
- Hummus is kind of in-between a dip and a paste
- Chickpeas can “stick” around blades if not enough liquid is used
Still, modern high-speed blenders handle this better than people expect. According to kitchen appliance testing notes from consumer reports in recent years, high-powered blenders (around 1000 watts or more) can process dense mixtures like nut butters and bean spreads with similar smoothness to food processors if enough liquid is added gradually (Consumer appliance testing summaries, 2023).
So yeah, it’s not just possible, it’s actually pretty common now.
Ingredients you actually need (and why each one matters)
You don’t need anything fancy, but the balance matters more than people think. Hummus is like a small chemistry experiment that just happens to taste good.
Basic ingredients:
- 1 can chickpeas (or 1.5 cups cooked chickpeas)
- 2–3 tablespoons tahini
- 2 tablespoons olive oil
- 1–2 garlic cloves (adjust if you don’t want “breath consequences”)
- Juice of 1 lemon
- 2–5 tablespoons cold water
- Salt to taste
- Optional: cumin, paprika, or a pinch of baking soda (for softer chickpeas)
A small but important note: the chickpea liquid (aquafaba) from the can is actually useful. It helps emulsify the blend and makes things smoother without adding weird flavors.
Nutrition-wise, chickpeas are not just filler. The USDA data shows 100g of chickpeas contains roughly 164 calories, 8.9g of protein, and a solid chunk of dietary fiber, which is one reason hummus feels surprisingly filling even in small amounts.
Blender hummus vs food processor hummus
People argue about this more than they should, honestly.
| Feature | Blender | Food Processor |
|---|---|---|
| Texture smoothness | Very smooth (if done right) | Naturally smooth |
| Ease of mixing thick paste | Needs liquid help | Easier |
| Speed | Fast but requires pauses | Steady and controlled |
| Cleanup | Slightly annoying | Easier overall |
| Result consistency | Depends on blender power | More reliable |
So the real answer is: yes, blender works, but you need to “help” it a bit more.
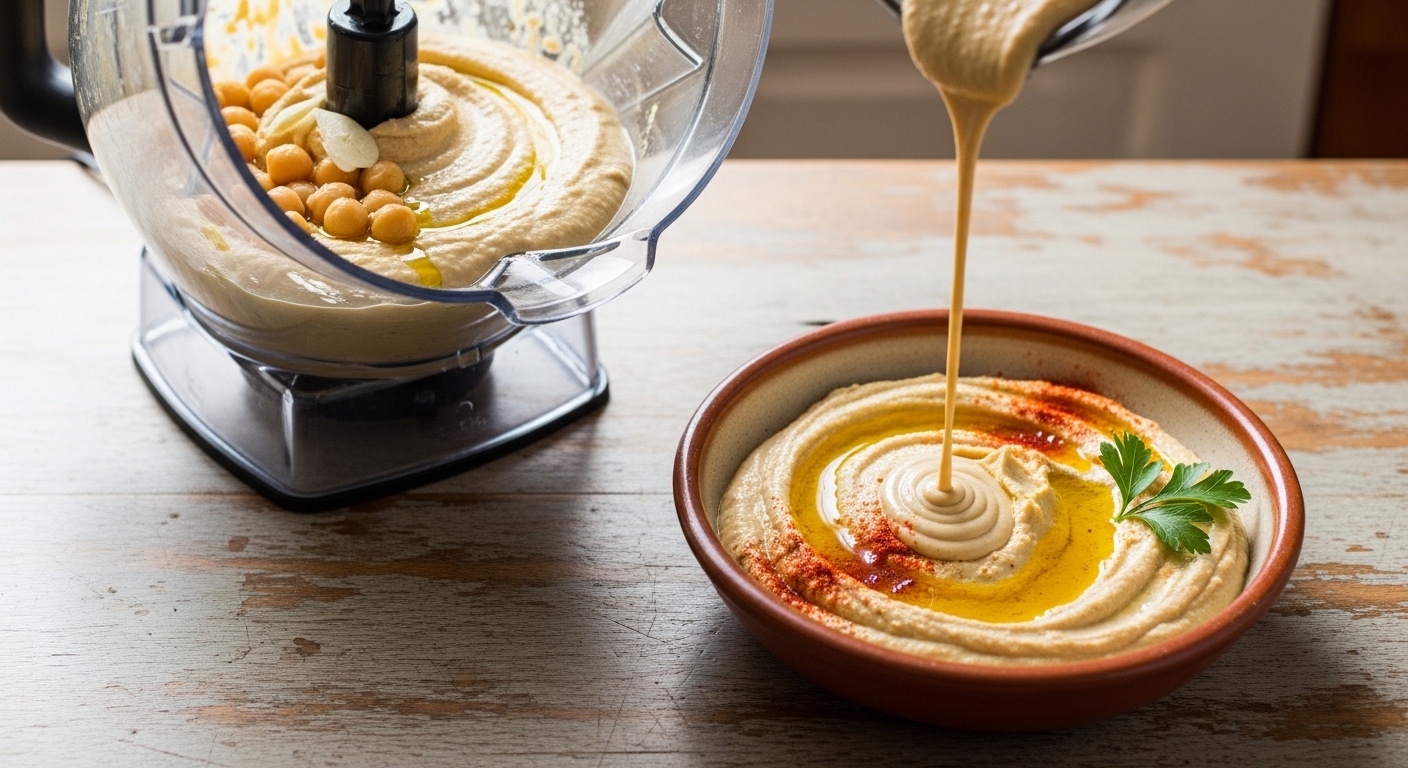
How to make hummus in a blender (step-by-step that actually works)
This is where most people go wrong—they just dump everything in and hope for magic. That usually ends with sad chickpea chunks stuck under the blades.
Try this instead:
Step 1: Prep your chickpeas properly
If you’re using canned chickpeas, rinse them well. Some people even peel them (yes, it’s annoying, but it does improve smoothness). If you boil them yourself, cook them until they’re very soft, almost slightly mushy.
Small trick: adding a pinch of baking soda while boiling softens the skins faster. It’s an old kitchen hack that actually works.
Step 2: Liquids first, always
Add lemon juice, tahini, garlic, olive oil, and a bit of water into the blender first. This creates a base that helps pull the chickpeas into the blades instead of letting them sit stubbornly at the bottom.
Step 3: Add chickpeas gradually
Don’t just dump them all at once. Add half first, blend, then slowly add the rest. This reduces strain on the motor and avoids uneven texture.
Step 4: Blend, stop, scrape, repeat
This part is slightly annoying but important. Blend for 20–30 seconds, stop, scrape the sides, then continue. You may repeat this 3–5 times.
Step 5: Adjust texture
Now you control the final outcome:
- Too thick → add cold water, 1 tablespoon at a time
- Too runny → add more chickpeas or a little tahini
- Not creamy enough → blend longer, don’t rush it
Common mistakes people make (and why their hummus turns weird)
This is where most blender hummus attempts go slightly off-track.
- Using too little liquid → blades can’t move mixture properly
- Overloading blender at once → uneven texture, chunks remain
- Not blending long enough → gritty hummus (not great honestly)
- Skipping acid (lemon) → flat, dull taste
- Forgetting salt balance → everything tastes “empty”
A food science note worth mentioning: emulsification is key here. Harvard food chemistry notes describe emulsions as mixtures where fat and water are stabilized into a smooth texture, and hummus relies heavily on this effect between tahini, oil, and water (Harvard food science summaries, general reference).
Flavor variations you can try once you get it right
Once you master basic hummus in a blender, things get a bit fun.
Roasted garlic hummus
Roast garlic before blending for a sweeter, deeper flavor. It removes that sharp bite raw garlic has.
Spicy chili hummus
Add red chili flakes or fresh green chilies. This version is very popular in South Asian households too, slightly different from Mediterranean style.
Beet hummus
Add boiled beetroot for color and earthy sweetness. It turns bright pink, which feels almost unreal the first time you see it.
Herb hummus
Blend in parsley, coriander, or even mint for a fresher profile.
Storage and how long it actually lasts
Homemade hummus doesn’t last forever, but it holds up pretty well if stored right.
- Refrigerator: 4–6 days in airtight container
- Freezer: up to 2 months (texture changes slightly after thawing)
A thin layer of olive oil on top helps prevent drying and oxidation. It’s a small detail, but it makes a difference.
Quick nutrition breakdown (why people actually eat this so much)
Hummus is one of those foods that feels indulgent but is surprisingly balanced.
Approximate per 100g:
- Calories: ~160–170 kcal
- Protein: ~7–8g
- Fiber: ~5–6g
- Healthy fats: mainly from olive oil and tahini
The Food and Agriculture Organization (FAO) often highlights legumes like chickpeas as important plant-based protein sources in global diets, especially in regions where meat consumption is lower or more expensive (FAO nutritional reports, general summary).
So yeah, it’s not just a dip, it’s kind of a complete mini-meal in disguise.
FAQ: can you make hummus in a blender without messing it up?
Will it taste the same as restaurant hummus?
Pretty close, especially if you get the lemon-tahini balance right. Some restaurants still win on texture because they use industrial processors, but home versions can get surprisingly close.
Do I need expensive blender?
Not necessarily, but stronger motors (600–1000W+) definitely make life easier. Weak blenders can struggle and leave you with uneven paste.
Why is my hummus grainy?
Usually under-blending or not enough liquid. Chickpea skins also play a role, which is why some people remove them.
Can I skip tahini?
Yes, but it changes the identity of hummus slightly. You’ll still get a dip, just less creamy and less “traditional.”
Final thoughts (not too polished, just real talk)
So yeah, can you make hummus in a blender without it turning into a kitchen disaster? absolutely, and once you do it a couple times it becomes one of those things you stop overthinking. The blender isn’t even a backup option anymore—it just becomes another normal way to do it.
It might take a little more stopping and scraping than a food processor, and the first attempt might feel slightly off, like something is missing. But that’s usually just texture calibration, not failure.
And honestly, once you nail it once, you’ll probably end up making it again and again without even planning to.

Jamesmathew is an expert Amazon affiliate writer, helping readers discover top products, smart deals, and practical buying guides through honest reviews and insightful content.